# Smorg knowledge base

Welcome to the Smorg Knowledge Base! Here you'll find helpful guides and articles to help you build your app using Smorg Studio. Browse the links below or use the search bar to quickly find what you need.

If you are new and have questions, check out our FAQ section [Frequently Asked Questions](/frequently-asked-questions/frequently-asked-questions) or use search to quickly find what you need.

### Jump right in

<table data-view="cards"><thead><tr><th></th><th></th><th data-hidden data-card-cover data-type="files"></th><th data-hidden></th><th data-hidden data-card-target data-type="content-ref"></th></tr></thead><tbody><tr><td><strong>Getting Started</strong></td><td>Preview your first app</td><td><a href="/files/U6LclaqZxPYQshodlgK9">/files/U6LclaqZxPYQshodlgK9</a></td><td></td><td><a href="/pages/CyH2xJQs9yWJ1S8BYNav">/pages/CyH2xJQs9yWJ1S8BYNav</a></td></tr><tr><td><strong>Basics</strong></td><td>Learn the basics of Smorg</td><td><a href="/files/fmTB8BsurOBMhYdgSJ9H">/files/fmTB8BsurOBMhYdgSJ9H</a></td><td></td><td><a href="/pages/XROzYxk0mJ5pHt9hHkr8">/pages/XROzYxk0mJ5pHt9hHkr8</a></td></tr><tr><td><strong>Recipes</strong></td><td>Create and publish your own recipes</td><td><a href="/files/8oUukcciVHfUJY1aiFer">/files/8oUukcciVHfUJY1aiFer</a></td><td></td><td><a href="/pages/2rNwQEBWQgFdk9ADWc2G">/pages/2rNwQEBWQgFdk9ADWc2G</a></td></tr><tr><td><strong>Programs</strong></td><td>Create and publish your own programs</td><td><a href="/files/xrd5oFnTOcFXidCHjUnw">/files/xrd5oFnTOcFXidCHjUnw</a></td><td></td><td><a href="/pages/QoebvYNTK01TIgMh9DOm">/pages/QoebvYNTK01TIgMh9DOm</a></td></tr><tr><td><strong>Integrations</strong></td><td>How to use our Zapier integration</td><td><a href="/files/TylpM6otG50246stpOJn">/files/TylpM6otG50246stpOJn</a></td><td></td><td><a href="/pages/TUoGAkFGGGNDzK0TDpFz">/pages/TUoGAkFGGGNDzK0TDpFz</a></td></tr><tr><td><strong>Manage your App</strong></td><td>Testing and managing your app.</td><td><a href="/files/FSQxzBFUbVwxuBdjOY1l">/files/FSQxzBFUbVwxuBdjOY1l</a></td><td></td><td></td></tr></tbody></table>


# Quickstart

Beautiful apps start with the content you create — and Smorg makes it easy to get started with pre-existing content, and publish it to an app designed in your theme.

Follow the steps below to quickly add and organise recipe content, and preview it in your app.

### Import your recipes

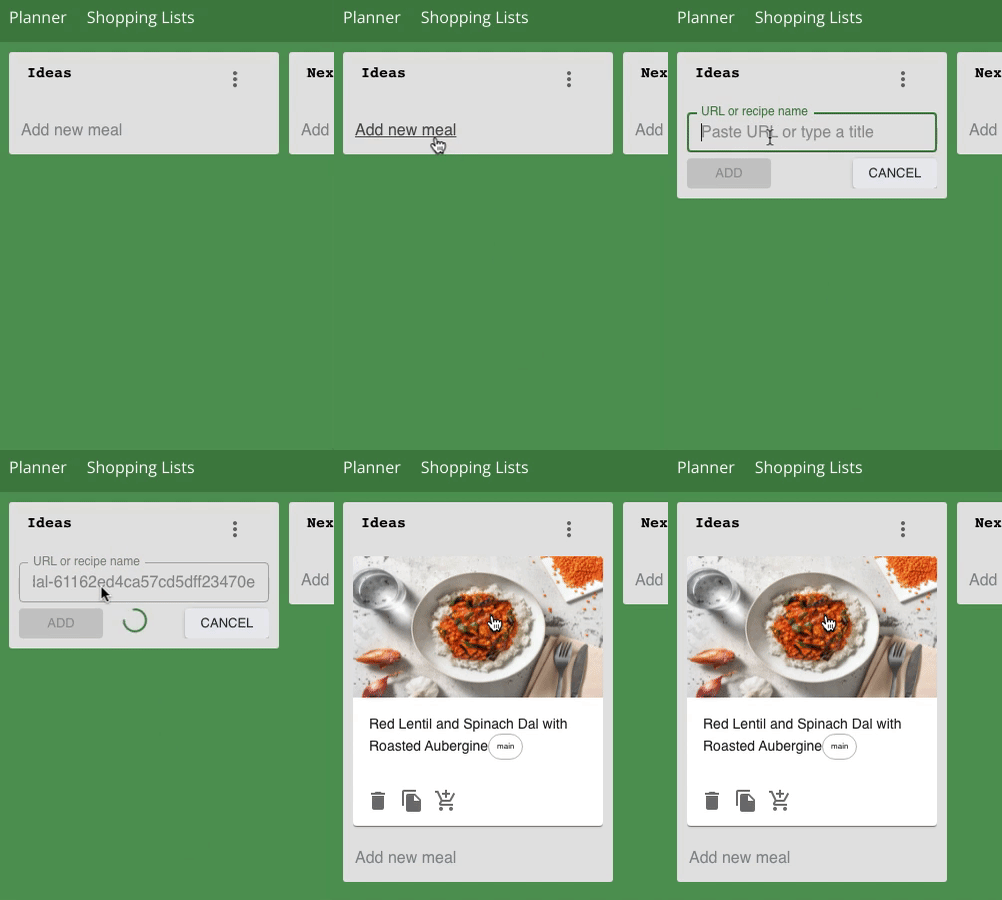
Smorg supports multiple methods of importing recipe content. Try finding an internet recipe, copy the URL and then go to Smorg Studio and click the Recipes screen, and copy/paste the recipe URL like below.

{% embed url="<https://files.gitbook.com/v0/b/gitbook-x-prod.appspot.com/o/spaces%2Fr9bdlQGFzhny8zWPvxIn%2Fuploads%2FPoP0Ri5gboPMa43jVxMN%2Fimport_internet_recipes.gif?alt=media&token=3ca38874-9e59-40bb-a7b1-b7cfebda5814>" fullWidth="false" %}

{% hint style="info" %}
Want to learn about creating recipes? Head to the [Recipes](#import-your-recipes) section to learn more.
{% endhint %}

### Organise your recipes

Smorg allows you to organise your recipes into editable Menus and Recipe cards. Create the menus you want, and simply drag and drop the cards as you need; it works a bit like Trello!

The menus you create become category labels in the app.

<figure><img src="/files/JET5X6R8PQMMIDm7Umhr" alt=""><figcaption></figcaption></figure>

### Publish your recipes

In the Recipes screen, click the 3 dots navigation in the top right hand corner and click "Publish board to space".

### Preview your app

Go to the "Your App" section in Smorg Studio, and point your mobile phone at the QR code on that screen, click the link on your phone and go through the account creation process to set up your account.

{% hint style="danger" %}
**IMPORTANT**: use a different email account to sign up, don't use your Smorg Studio email address.
{% endhint %}

Once  you've signed up, there's your App! Go to the Recipes screen from the navigation screen, and you'll see your recipes listed there.

### What's next?

Find out more about adding and moderating recipes

Organise your recipes into collections

FInd out how to create your meal plans and programs

Want to learn how to theme your app?


# Smorg basics

Smorg is designed around boards, with each board having lanes comprising content items - it's a design inspired by Trello. Using the simple drag and drop interface, you can easily add and organise your content as you wish.

<figure><img src="/files/QZepO3jHpjIJfeKiDbHk" alt=""><figcaption></figcaption></figure>

There are 3 main content sections in Smorg are:&#x20;

* **Recipes**
  * Create an organise your own recipe content
  * Find out more about Recipes here: [What's in a recipe?](/recipes/whats-in-a-recipe)
* **Programs**
  * Create your own calendar based "health program", including personalised meal plans, food trackers, drip courses and more
  * Find out more about Programs here: [Find out about Programs](/programs/find-out-about-programs).
* **Courses.**
  * Create courses comprising text, images and videos, that can be published separately from Recipes and Programs.
  * Find out more about Courses here: [Courses](/courses/find-out-about-courses)


# What's in a recipe?

Find out how recipes are structured

Here's a summary of all the details you can find and edit in a recipe.

{% embed url="<https://files.gitbook.com/v0/b/gitbook-x-prod.appspot.com/o/spaces%2Fr9bdlQGFzhny8zWPvxIn%2Fuploads%2FcTHQiaPpVCJ6aTsrlwMB%2Frecipe%20metadata%20-%20Made%20with%20Clipchamp.mp4?alt=media&token=bfa18830-6b22-43be-84af-ac28cc174673>" %}

In the recipe detail screen, you can change the title, the meal type, number of servings, the prep time, cooking time, and chef.<br>

**NOTE:** If you import a recipe from an internet site, the original internet URL is attributed. However, note that this will not appear in your end user apps.

#### Category Tags

You can also create **category tags**, which is a great way for your customers to search and find your recipes. Simply type in the category tags you want to use, and they will be added automatically to your category list which will display in the dropdown list for use in subsequent recipes you create.

These tags can then appear in the recipe search screen for your customers to use to find your recipes conveniently. To do this, configure which search tags you want to appear by going to Your App->Configure Search Tags.

#### Recipe images

You can upload your own recipe image or create a new image of your recipe using AI.

#### Multimedia Description field

In the description field, you can add text, images and also videos. We support many different video platforms including youtube, vimeo and also social networks such as Instagram and Tiktok.

You can use the preview feature to preview your recipe on a mobile emulator.

{% embed url="<https://files.gitbook.com/v0/b/gitbook-x-prod.appspot.com/o/spaces%2Fr9bdlQGFzhny8zWPvxIn%2Fuploads%2F4MISbOke1ZD2pAHSrIPI%2Frecipe%20nutrition%20-%20Made%20with%20Clipchamp.mp4?alt=media&token=f7e7586b-c383-4310-8948-9e7d16e079ab>" %}

#### Nutrition

All recipes come with full nutrition information, at recipe level and also per ingredient. Included in this are any relevant allergens, including Gluten Free, Nut Free, Shellfish Free, Vegan and Vegetarian, This is all calculated automatically using AI.

#### Editing Ingredients

All ingredients are editable, and you can use natural language to change ingredients easily, and also drag the position of the ingredient lines. Similarly for methods.

Clicking into an ingredient line shows you what the Food Brain recognises, and there are also suggested alternatives displayed.

You can also add subheadings to ingredients and also methods. To create a subheading using the format (# Heading name) and it will automatically turn into a subheading.

<figure><img src="/files/GVgnkw2E9TBGolE0EtWd" alt=""><figcaption></figcaption></figure>

If ingredients are not fully understood, a yellow flag will be displayed. A yellow info icon needs to be checked as the Food Brain would have made a "best guess", but a yellow warning icon means an ingredient line cannot be understood and needs to be corrected. Find out more about how to moderate ingredients here: [Moderating ingredients](/recipes/moderating-ingredients)

**See the next section to find out how to quickly add recipes**


# Adding recipes

Find out how you can add recipes into Smorg

### Importing recipes from an internet site <a href="#viewer-ef7ty15211" id="viewer-ef7ty15211"></a>

A very quick way of creating new recipe content is to import it from an internet site. The animation below illustrates how this can be done. Simply click "+ Add new meal" in the desired menu, and then paste the URL of your favourite internet recipe.

<figure><img src="https://static.wixstatic.com/media/294bf7_639ac08a59fc43798cd122a55a145d96~mv2.gif" alt=""><figcaption></figcaption></figure>

**Notes:**

* please make sure you copy and paste the URL of the recipe page (the one that includes the ingredients and methods), and not a top level collection page.
* we support most internet recipe sites (about 80% and increasing). However, some may not work.

Once you have imported a recipe into the board, you can then click into it to edit the details as per your requirements.

### Manually creating recipes <a href="#viewer-l2mk414177" id="viewer-l2mk414177"></a>

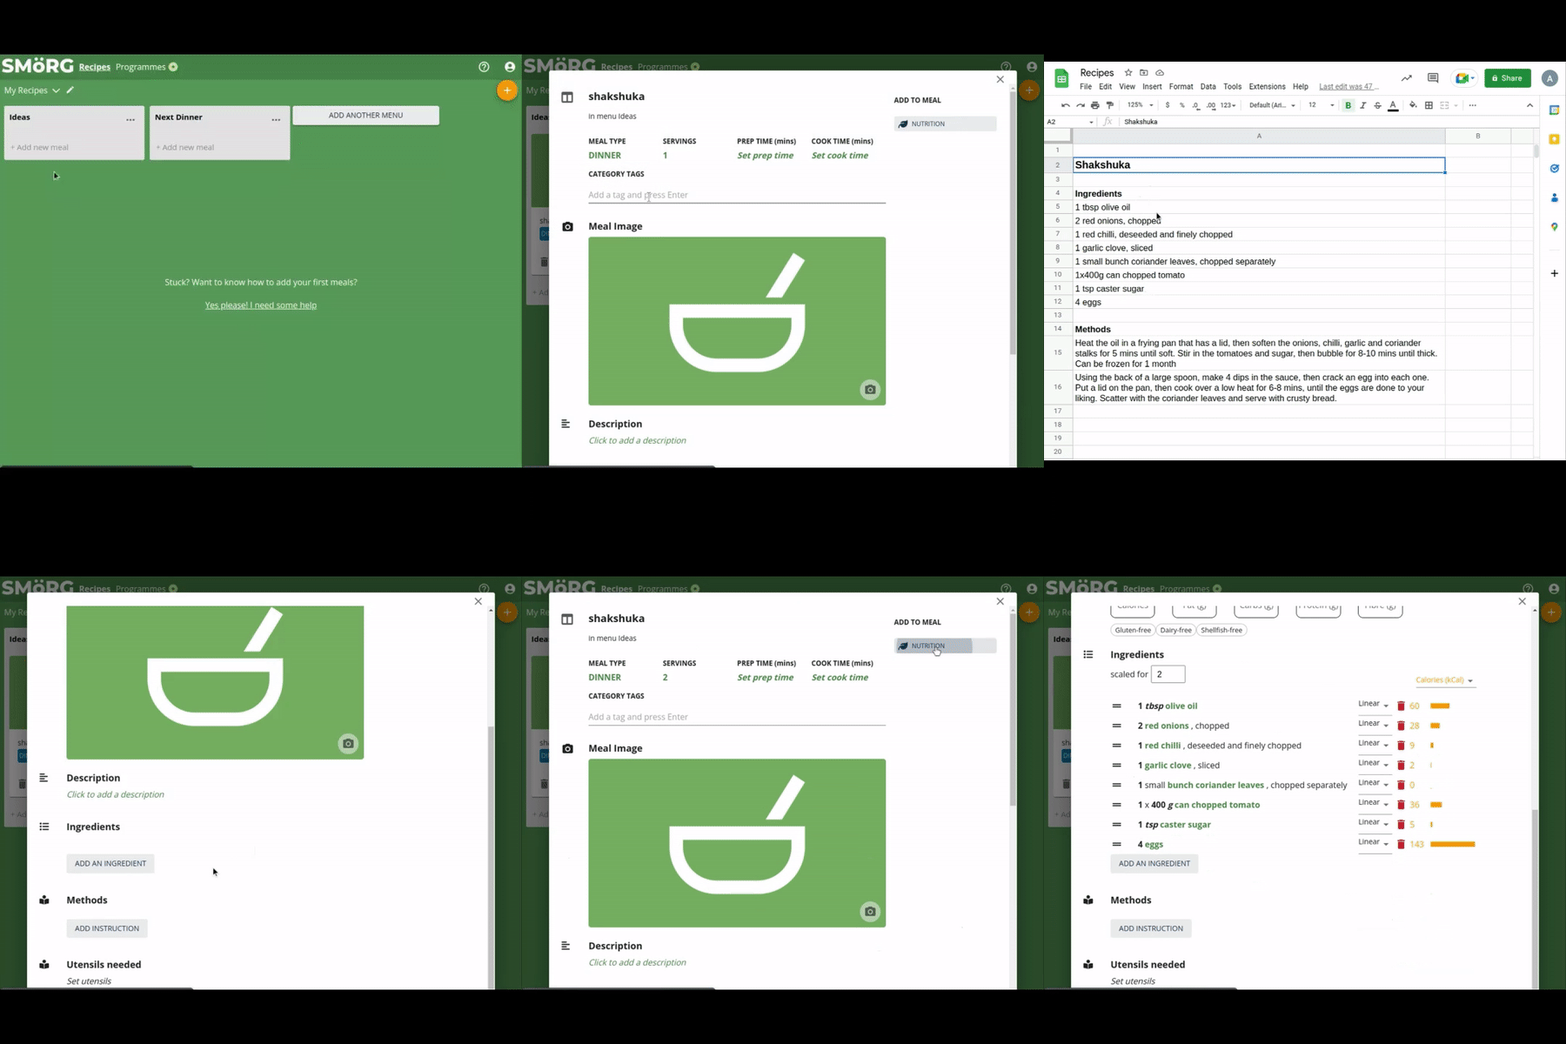
Firstly, click the "+Add new meal" in the menu of your choice. Then create a new recipe following the instructions in the image below:<br>

<figure><img src="https://static.wixstatic.com/media/294bf7_f9c33014a3574a4c94cb0b29cd222124~mv2.png/v1/fill/w_740,h_499,al_c,lg_1,q_90,enc_avif,quality_auto/294bf7_f9c33014a3574a4c94cb0b29cd222124~mv2.png" alt=""><figcaption></figcaption></figure>

\
Once you have done this, you can create your recipe by editing the recipe metadata, including ingredients and methods.

If you already have recipes written down in spreadsheets or Word documents, you can make use of our feature to **copy/paste recipes into your board**. See the animation below which illustrates this:<br>

<figure><img src="https://static.wixstatic.com/media/294bf7_0784991018b541d59984815ee39f7c16~mv2.gif" alt=""><figcaption></figcaption></figure>

### Adding recipes from our database <a href="#viewer-6yhez17814" id="viewer-6yhez17814"></a>

Smorg already comes with thousands of recipes, and you can use these in your own boards. To use this feature, use the "Search for meals" option in the Add new meals popup, and then search for the meals you want.

See the video below:

{% embed url="<https://files.gitbook.com/v0/b/gitbook-x-prod.appspot.com/o/spaces%2Fr9bdlQGFzhny8zWPvxIn%2Fuploads%2Fwq27AWTml1gJ8Ae7WV7y%2Fadd_recipes_from_database.mp4?alt=media&token=949c9672-f4ed-4f4b-a003-af702e0deab9>" %}

### Adding recipes to the top of the menu

Sometimes it's helpful to add recipes to the top of menu rather than at the bottom. To do this simply check the "Add to top of menu" option in the Add new meal menu. When checked, all new meals will be added at the top of the menu rather than the bottom.

<figure><img src="/files/zzcdv2VrommRPwbJTjHf" alt=""><figcaption></figcaption></figure>


# Moderating ingredients

It's important to check your recipe ingredients and ensure there are no yellow warning triangles. These ingredients are not properly understood by our Food Brain, and may lead to invalid nutrition data.

Here's a quick video showing you how you can easily correct these ingredients.

{% embed url="<https://files.gitbook.com/v0/b/gitbook-x-prod.appspot.com/o/spaces%2Fr9bdlQGFzhny8zWPvxIn%2Fuploads%2FojkwaYdBfsn9fNaxHKbk%2Fmoderate_recipes.mp4?alt=media&token=095fb746-b409-4bc4-8d9e-878b694be745>" %}

There are 2 ways to correct these ingredients:

1. Simply rewrite the ingredient line using natural language. Usually, if you follow the format of QTY UNIT INGREDIENT\_NAME, e.g. "100 gram mushroom" it will usually work.
2. The other way is to use the View Detail feature in the ingredient dropdown to search the nutrition database for the exact ingredient. You can also rewrite the ingredient line the exact way you want and reference the exact ingredient you want too.&#x20;


# Organising Recipes

Recipes are organised into boards. Each board comprises of "Menus", and meals within each menu. Use the 3 dot navigation in the top right hand corner to show create and edit boards, or switch between boards.

<figure><img src="/files/gOkBqDUQfjrjv3Z6hpbm" alt=""><figcaption></figcaption></figure>

Create the Menus you need, and simply drag and drop meals between them. It works like Trello.

<figure><img src="/files/JET5X6R8PQMMIDm7Umhr" alt=""><figcaption></figcaption></figure>

**One important point about menus.** Each menu "label" becomes a carousel heading in the end user app, in the Recipes screen, when it is published. We do this for all your published boards, grouping together meals by menus. Menus sharing the same menu label will be merged into one, e.g. the meals in the Breakfasts menu in Board A, will be merged with the Breakfasts menu in Board B. To enable this, make sure you use exactly the same spelling (case sensitive) for your menus.

<figure><img src="/files/ifUUWPV73FaAYESZLLQT" alt=""><figcaption></figcaption></figure>


# Creating recipe collections

How do I group recipes together and publish them? How can I send regular weekly recipe updates?

#### What is a recipe collection? <a href="#viewer-foo" id="viewer-foo"></a>

A recipe collection is simply a grouping of recipes which are presented to your customers in the Collections screen. The groupings should make it more convenient for your customers to engage with your recipe content.

Collections are also a great way to group together weekly recipe updates for your users.

<figure><img src="https://static.wixstatic.com/media/294bf7_735c51888b724cc09c85d0d1951c94a9~mv2.png/v1/fill/w_375,h_749,al_c,q_85,usm_0.66_1.00_0.01,enc_avif,quality_auto/294bf7_735c51888b724cc09c85d0d1951c94a9~mv2.png" alt=""><figcaption></figcaption></figure>

### Creating collections<br>

Each recipe collection is simply a recipe "board" in Smorg Studio that is published to your space. Here's what you need to do:

1. Create a recipe board in Smorg Studio<br>

In Smorg Studio. go the **Recipes** screen ([click here to access](https://app.smorg.io/recipes)) and create a new recipe board by using the 3 dots navigation dropdown in the right hand corner, and select "Create a new recipe board"

<br>

<figure><img src="https://static.wixstatic.com/media/294bf7_86766de8b10f4b3eb62d37551a7cafed~mv2.png/v1/fill/w_581,h_394,al_c,lg_1,q_85,enc_avif,quality_auto/294bf7_86766de8b10f4b3eb62d37551a7cafed~mv2.png" alt=""><figcaption></figcaption></figure>

2\. Add new recipes into your board and organise<br>

Add in recipes in the usual way ([see here for instructions](https://www.help.smorg.io/post/creating-recipe-content)). Organise your recipes into menu lanes. Each menu lane will be used as a recipe category heading in the collection, and the board name becomes the collection name.

<figure><img src="/files/Km2zJP6YDMnrKKi3w7N2" alt=""><figcaption></figcaption></figure>

3\. Edit the board meta data

Using the 3 dot navigation, select Edit recipe board and add a cover image. The cover image will be the thumbnail image that is displayed in the App Collections screen.

<figure><img src="/files/17zpmf7bUWtCsEdloTeS" alt=""><figcaption></figcaption></figure>

You can also include a Short Description which is published along with the collection, and appears at the top of the collection screen.

4\. Publish your board

\
When you are happy with your board, you can publish your board to your space by selecting the Publish board to space menu item.&#x20;

<br>

<figure><img src="https://static.wixstatic.com/media/294bf7_453e0d851cfa4abd8cc09460972ab909~mv2.png/v1/fill/w_309,h_361,al_c,lg_1,q_85,enc_avif,quality_auto/294bf7_453e0d851cfa4abd8cc09460972ab909~mv2.png" alt=""><figcaption></figcaption></figure>

Once published, it will be seen almost immediately in the Collections screen in your end user App, and clicking into it will reveal the collection recipes. (see below).

<figure><img src="/files/vYt00isMgR9vhi1ZORLV" alt=""><figcaption></figcaption></figure>

5\. Making changes

\
**IMPORTANT**: If you make any changes to your board after publishing it, you need to select the "Publish changes to your space" to send those changes to the end user App. You can also Unpublish a board.


# Find out about Courses

How to create and organise courses

You can create course content in the Content screen in Studio.

<figure><img src="/files/2XICxE8AWi3grmbAW5GJ" alt=""><figcaption></figcaption></figure>

Like the recipes screen, courses can be organised into Content Boards, and within each board you can create Content Lanes, each with their own Category Heading. The Course actions menu in the top right hand corner allows you to create, edit and delete boards as needed.

Our content editor gives you a lot of flexibility to create the content that you need.

<figure><img src="/files/jq3XhUV3zayL5aNCkdbo" alt=""><figcaption></figcaption></figure>

Let's go through each of these sections in turn.

### Content Title

Defined at the top of the screen, titles appear overlaid on top of the cover image that you define in white text. In this case, the cover image is darkened slightly to accommodate the text. If the title is empty, then no title will be displayed.

<figure><img src="/files/aabXQq2hE1UrWkBPZatO" alt=""><figcaption></figcaption></figure>

### Cover Image

The cover image used for the content. For sizing information, see [Smorg image size reference](/managing-your-app/smorg-image-size-reference)

The cover image is used to create a Content Thumbnail used in the carousel displays when published to the My Day screen, and also in Programs.

Note that by checking the "Show as header" checkbox, the cover image will appear as the header in your content automatically (preview this by clicking Preview in Emulator)

### Content Editor

Use the content editor to create your content.&#x20;

* **Text fonts and background colours**
  * Define background colours, font colours, fonts and font sizes as per the menus.&#x20;
* **Links**
  * Define URL links that will resolve an open in a new browser window. For mobile native apps, the
* **Images**
  * There are many different ways of adding image content:
  * Use the Insert->Image feature and select images from your computer
  * Drag and drop an image file directly into the editor
  * Paste images directly into the content editor
* **Videos**
  * Easily import your video content by clicking Insert -> Video and adding the public URL of your video. The video will automatically be imported in. We currently support Vimeo and Youtube, although other video platforms are also supported.

{% embed url="<https://files.gitbook.com/v0/b/gitbook-x-prod.appspot.com/o/spaces%2Fr9bdlQGFzhny8zWPvxIn%2Fuploads%2FUzZQr2RYoPIYAEue50EQ%2FSmorg%20(9).webm?alt=media&token=fe703ed0-ad20-4510-a448-eaf4ad8a708c>" %}

* **External Apps**
  * If you want to insert apps that support embedded JS snippets (e.g. Calendly, Typeform), you can add these by selecting Insert->Code and pasting the JS embed code into the window.
* **Preview in Emulator**
  * Click this to see a preview of your content in the emulator

### Content Navigation

This feature allows you to use a Content Thumbnail as a navigation aid for your customers. When used, a card is linked directly to other parts of your app.&#x20;

<figure><img src="/files/79i6iJtpa9bnxKFrjHTS" alt=""><figcaption></figcaption></figure>

Options for this include:

* Linking to other screens in your App: Recipes screen, or the Planner screen, or the Shopping lists screen
* Link to either your Programs screen, or to a specific Program.
* Link to another Content Board. This is useful if you want to organise your content into a taxonomy.
* Link to an External URL, which could link to an external site (e.g. Shopify) or a deep link to another app (e.g. Facebook, WhatsApp).

### Adding Content to the Top of the Category&#x20;

Sometimes you might want to add new content at the top of a category so that it appears first in the content


# Organising your Courses

How to organise and publish your content

### Publishing your Courses to the My Day screen

You can decide which Content Lanes to publish and where they will be displayed by going to the Your App -> Configure My Day content screen. See the video below.

{% embed url="<https://files.gitbook.com/v0/b/gitbook-x-prod.appspot.com/o/spaces%2Fr9bdlQGFzhny8zWPvxIn%2Fuploads%2FGbzTUJpvQI9xRTReh9hq%2FSmorg%20(10).webm?alt=media&token=91136d5b-b3ad-4c3b-86d3-3bd9fdccbfa7>" %}

All your Content Lanes will be available within this section, and then simply drag them in the order you want. Each section will appear in the specified order in your app.

<figure><img src="/files/MnEHepxhwjfAWVD9R3bV" alt=""><figcaption></figcaption></figure>

### Ordering your content in a Content Lane

The content that appears in the content carousels is ordered as it is listed in the Content Lanes. i.e. the top-most content item will appear first in the content carousel. If you want to add new content to the top of the lane (rather than the bottom), simply select the "Add new post" action from the 3 dot navigation at the top of the lane (as below).

<figure><img src="/files/9RsPDWkIG0WLBKh4Z0NL" alt=""><figcaption></figcaption></figure>

### Publishing content in a Program

You can also publish your content to a program. Click the "Copy to program" action button in your content cards as shown below, select the program you want to copy to, and then click Copy.

<figure><img src="/files/sFqYjQdeY5HUBhFKKLPE" alt=""><figcaption></figcaption></figure>

### Organising your Content in a Taxonomy

If you want to organise your content in folders, and publish to the My Day screen you can do so by using the Content Navigation feature to link boards.

1. Organise your folders of content into separate content boards in the Content screen.
2. At the top level of your navigation, link a content thumbnail to the appropriate content board to create the next level of your content hierarchy. In this next level, you can then create further links to link to the other content boards to create your hierarchy.

Here's a quick example of how it could be set up:

{% embed url="<https://files.gitbook.com/v0/b/gitbook-x-prod.appspot.com/o/spaces%2Fr9bdlQGFzhny8zWPvxIn%2Fuploads%2FZcyrRYpOOB4GbYHvVud9%2FSmorg%20(14).webm?alt=media&token=4fbf30a9-0105-4da6-9a77-653228c9e60a>" %}

To produce something like this:

{% embed url="<https://files.gitbook.com/v0/b/gitbook-x-prod.appspot.com/o/spaces%2Fr9bdlQGFzhny8zWPvxIn%2Fuploads%2FE2ZFzp1kS0RsOtAcy8UF%2FSmorg%20(13).webm?alt=media&token=2f7df454-24e6-4476-988e-fcb4ae508bdc>" %}


# Adding videos

More guidance around adding videos

You can add videos to any Content item body, or any Recipe description in Studio (see [Find out about Courses](/courses/find-out-about-courses#content-editor)). Here are some additional guidelines.

### Vimeo guidelines

. When adding Vimeo videos, use the public URL that can be accessed via your Vimeo dashboard, and using the Copy link dropdown for the video you want to add.

<figure><img src="/files/ZQOg1Xmnb2bx89UPhooX" alt=""><figcaption></figcaption></figure>

Additionally, its worth limiting the number of controls visible to users by editing the Appearance settings. The controls can be overcrowded in the player when used on a mobile device.

### Youtube guidelines

You can use any "shareable" link from Youtube, including any that you find published to Youtube or for more restricted videos, use the shareable link that can be found in Youtube Studio, in the options dropdown against the video you choose.

<figure><img src="/files/GAYW5RNAY1Z5FTBEx8hD" alt=""><figcaption></figcaption></figure>


# Find out about Programs

What's a program? Find out more in this article

### What is a Program?

A program is a structured collection of content organized by calendar days, designed to be delivered sequentially to your customers. It can include elements like meals, courses, or lessons.<br>

Programs are ideal for offering **meal plans, drip-fed courses,** or **multi-week health and wellness programs.**

Our Program feature in Studio allows you build and structure the content you need, as shown below.

<figure><img src="/files/c47iBCql5iHbnwHbQv36" alt=""><figcaption></figcaption></figure>

Meals are created in the Recipes section and added individually to your program, and structured to form a meal plan. Customers using your program in your app will see these recipes exactly how you've defined them, and can fine tune them (swap them) for other recipes available in associated Recipes boards. It is not mandatory to add meals to your program.

Course content is created in the Content section and added individually to the program.

Once built and published, your programs can be offered to your customers via your end user app.

### What do Programs look like in the end user app?

The video below shows how what a personalised meal plan program could look like.

{% embed url="<https://files.gitbook.com/v0/b/gitbook-x-prod.appspot.com/o/spaces%2Fr9bdlQGFzhny8zWPvxIn%2Fuploads%2FvUOJHhHiCQMVSTG6SsUs%2FSmorg%20Demo%20(1).mp4?alt=media&token=1b927eec-02ba-42c7-818b-5830d0260676>" %}

and a drip-course program.

{% embed url="<https://files.gitbook.com/v0/b/gitbook-x-prod.appspot.com/o/spaces%2Fr9bdlQGFzhny8zWPvxIn%2Fuploads%2FmrPch7m4489GaIcNH8Ew%2FSmorg%20Demo%20(2).mp4?alt=media&token=4f5f457f-a72d-44b6-b1c8-05efe37af21d>" %}

###


# Creating a Program

How to create programs

Create a new program by going the Programs screen and selecting Create New Program

<figure><img src="/files/ETOD3OngEcGFHHli8aZU" alt=""><figcaption></figcaption></figure>

#### Program Name

This is the name of the program that will be shown to customers.

#### Program Cover Image

Use an image of dimension 400 x 345. This will serve both as a thumbnail image for your program when listed in the Programs screen of your end user app, and the cover image of the long description.

#### Short description

A short description of your program

#### Long description

A longer description of your program. This will serve as a program preview for your customers, and should include as much information as you can to provide them with a good overview. The long description can contain text, images and video content.

#### Program Duration

The duration of your program in weeks.

#### Assign Recipe boards

If you want to add recipes to your programs, it's important to select which of your recipe boards you want to be associated with your program. To find out how to create recipe boards and add recipes, follow the guide here [Adding recipes](/recipes/adding-recipes) and here [Organising Recipes](/recipes/organising-recipes)

When customers start your program, they will have access to all the recipes that are in your assigned recipe boards. This is a good way to restrict the choice your users will have over your recipes when they are on this program, and you can do that by selecting those recipes into recipes boards first, and then assigning these to the program.

#### Meal Types

The meal types you want for your program, along with associated calorie splits.

#### Nutrition Constraints

As defined in [#nutrition-constraints](#nutrition-constraints "mention")


# Fill your program with recipes

Add recipes to your programs

There are multiple ways in which you can add meals to your program.

1\. Use the auto planner

\
This feature will allow you to use a meal planning wizard to fill your program automatically using rules that you define. If you need to set nutrition constraints, please check out the section on [Adding Nutrition Constraints](https://www.help.smorg.io/post/adding-nutrition-constraints)

Click the video below to see how you can use the auto planner.<br>

{% embed url="<https://files.gitbook.com/v0/b/gitbook-x-prod.appspot.com/o/spaces%2Fr9bdlQGFzhny8zWPvxIn%2Fuploads%2FozPDwz1K5tZjCZARgGxY%2Fadding_recipes_to_program.mp4?alt=media&token=00c5edff-5f50-451f-92af-592e25343044>" %}

#### 2. Add meals individually from your recipe board <a href="#viewer-8cohg" id="viewer-8cohg"></a>

You can also copy meals individually from your recipe board into your program. Simply click the calendar icon in the appropriate meal card, and then select which program, week and day(s) to copy the meal.

<figure><img src="https://static.wixstatic.com/media/294bf7_33aefb3f939f4b01a442730010dc0e18~mv2.png/v1/fill/w_740,h_464,al_c,q_85,usm_0.66_1.00_0.01,enc_avif,quality_auto/294bf7_33aefb3f939f4b01a442730010dc0e18~mv2.png" alt=""><figcaption></figcaption></figure>

\
\ <br>


# Fill your program with Course Content

Add courses to your program

You can also add course content to your programs in addition to meals, OR you can have a program of just courses that are drip fed to your customers.&#x20;

Follow the instructions in [Organising your Courses](/courses/organising-your-courses)to find out how you can create course content and add it to your programs.


# Adding nutrition constraints

How to add nutrition constraints to your program

Usually when you are planning meals for your clients, you would like to set nutrition constraints for them to abide by.

Smorg supports several types of nutrition constraint, including macro-nutrients, micro-nutrients, food exclusions and food preferences.

Let's go through some examples. For example if you wanted to create a keto diet plan with the following constraints:

* Less than 10 percent of your total calories from carbohydrates per day
* The remaining calories should come from 20 to 30 percent protein and 60 to 80 percent fat

Let's set this up in Smorg:

<br>

{% embed url="<https://files.gitbook.com/v0/b/gitbook-x-prod.appspot.com/o/spaces%2Fr9bdlQGFzhny8zWPvxIn%2Fuploads%2FtG7zlv5qJ6jBM9kHXh52%2Fadding_nutrition_to_programs.mp4?alt=media&token=cb8ef1bb-2f92-41b3-991c-2b834ecd7734>" %}

**REMEMBER:**

* Check the "Personalised meal scaling" if you want the meals to be personalised to your clients' calorie targets.
* Check the "Display nutrition to users" setting if you want the nutrition settings to be displayed in your clients's app.
* The assumed calories per day when creating meal plans this way is 2000kCal per day. Of course when the meal plan is actually used, it will be personalised to your customers' BMR.

\ <br>

Once you have set the nutrition constraints, you can then start filling the program plan with meals. When meals are added, the nutrition headers will automatically add up your specified nutrients in the meals for the day.

<br>


# Personalised nutrition

How do we calculate personalised daily calories? Are meals chosen to fit daily nutrition targets?

We use the Mifflin-St Jeor equation to calculate personalised nutrition calorie targets. Your programs can optionally use this to personalise nutrition targets for your customers by having them complete a "BMR" quiz during onboarding.

The BMR quiz takes the following information:

* Biological gender
* Age
* Height
* Current weight
* Current activity level
* Target weight
* Duration to reach target weight

We then use the results of this to calculate personalised calorie totals, and from this we can calculate any %BMR metrics you have defined for macros in your program, e.g. Carbs, Protein, Fat.

### How do I activate this for a program?

In Smorg Studio, go to Programs and select your Program, and from the plus navigation click "Edit nutrition constraints", and set the Personalised Meal Scaling option.

<figure><img src="/files/AHvv8yCxUKfBY04HgWLm" alt=""><figcaption></figcaption></figure>

### Can customers change these answers?

Customers can changes these answers in their Profile -> Personal Information settings in the end user app.

### Can customers change the calorie totals?

Customers can enter their own calorie targets in their Profile -> Personal Information settings in the end user app.


# Duplicating Programs

How to duplicate programs?

Sometimes you want to start a new program by duplicating an existing program and making some changes. If you want to duplicate an existing program, you can use the duplicate program feature accessed from the Program actions button.

<figure><img src="/files/nTORWO2dQPLKR7I6FEPk" alt=""><figcaption></figcaption></figure>

A duplicated program will create a copy of the program including it's associated meta data and assets including: program meals, program content, the program thumbnail, description, nutrition constraints and meal types.

It's important to note that although meals and content are duplicated, they will still reference the original meal or content item. This means that if you make any changes to the referenced meal or content item, it will be changed in all programs they are referenced.


# Publishing your program

How do I publish my programs to the end user app?

When you are done with your program and ready to release it to your users, simply click Publish from the Program actions menu in the Programs screen:

<figure><img src="/files/nccBVLZRdlvibNLfLqTu" alt=""><figcaption></figcaption></figure>

It might take a few seconds for a program to be published, when it is published you'll see a notification in the bottom left hand corner, and a PUBLISHED label in the top right hand corner (see below):

<figure><img src="/files/2w8YIRN3UyTMgN9XURDb" alt=""><figcaption></figcaption></figure>

When a program is published, it will appear immediately in your end users' apps in their Programs screen.&#x20;

Also when a program is published, any meals that are referenced will have a special indicator telling you that the meal is "live" and visible to end users.

<figure><img src="/files/Qfb78MZrhrHzHPQWlDdw" alt=""><figcaption></figcaption></figure>

**IMPORTANT**: If you make any updates to your program, remember to publish the program again so that your end users can see your updates.

If you want to delete this recipe, you'll need to unpublish the program first before deleting it.

To unpublish a program, simply select the Program actions menu and select Unpublish.


# Using Zapier to send welcome emails

Find out how to use Zapier to send welcome emails

Follow the steps below to send welcome emails to your new subscribers.

Step 1: Go to [zapier.com](http://zapier.com/), log into your account

Step 2: Click the link below and accept the invite to install the Smorg Zap into your account<br>

<https://zapier.com/developer/public-invite/187149/c9ebda5b8e3803be327f201626804043/>

Step 3: Create a new Zap, (selecting Zaps)<br>

<figure><img src="https://static.wixstatic.com/media/294bf7_879e814f8c0d41e288e7a9446f7ea73a~mv2.png/v1/fill/w_740,h_382,al_c,q_85,usm_0.66_1.00_0.01,enc_avif,quality_auto/294bf7_879e814f8c0d41e288e7a9446f7ea73a~mv2.png" alt=""><figcaption></figcaption></figure>

\ <br>

Step 4: Click Trigger

<figure><img src="https://static.wixstatic.com/media/294bf7_e880afb5798844239787d8c14c5b7e38~mv2.png/v1/fill/w_740,h_600,al_c,q_90,usm_0.66_1.00_0.01,enc_avif,quality_auto/294bf7_e880afb5798844239787d8c14c5b7e38~mv2.png" alt=""><figcaption></figcaption></figure>

<br>

Step 5: Search for Smorg and select the Smorg Zapier Integration

\ <br>

<figure><img src="https://static.wixstatic.com/media/294bf7_542b857b66b0471698a8dd86bf344a2b~mv2.png/v1/fill/w_740,h_562,al_c,q_90,usm_0.66_1.00_0.01,enc_avif,quality_auto/294bf7_542b857b66b0471698a8dd86bf344a2b~mv2.png" alt=""><figcaption></figcaption></figure>

\ <br>

Step 6: In the trigger, select the User subscribed trigger event

<br>

<figure><img src="https://static.wixstatic.com/media/294bf7_2a837c4c623a47ee9a7ab91030840374~mv2.png/v1/fill/w_740,h_612,al_c,q_90,usm_0.66_1.00_0.01,enc_avif,quality_auto/294bf7_2a837c4c623a47ee9a7ab91030840374~mv2.png" alt=""><figcaption></figcaption></figure>

<br>

Step 7: In the account section, connect to a new account

<br>

<figure><img src="https://static.wixstatic.com/media/294bf7_00011ae2aa3a47998505a1b9226a5595~mv2.png/v1/fill/w_740,h_577,al_c,q_90,usm_0.66_1.00_0.01,enc_avif,quality_auto/294bf7_00011ae2aa3a47998505a1b9226a5595~mv2.png" alt=""><figcaption></figcaption></figure>

<br>

In the proceeding screen, enter your Space ID and API Key in the form fields provided<br>

Then click continue. You should see a screen like this:<br>

<figure><img src="https://static.wixstatic.com/media/294bf7_a89b1654cf1449afa67e4276e508d76a~mv2.png/v1/fill/w_740,h_633,al_c,q_90,usm_0.66_1.00_0.01,enc_avif,quality_auto/294bf7_a89b1654cf1449afa67e4276e508d76a~mv2.png" alt=""><figcaption></figcaption></figure>

<br>

Step 7: Click Test Trigger, and then Skip test

<br>

Step 8: The next screen will show you the data that will be passed to the Action step when a user is subscribed in Smorg.

<br>

<figure><img src="https://static.wixstatic.com/media/294bf7_c52d55504a4b42b68bcb52f110f2ebfb~mv2.png/v1/fill/w_740,h_620,al_c,q_90,usm_0.66_1.00_0.01,enc_avif,quality_auto/294bf7_c52d55504a4b42b68bcb52f110f2ebfb~mv2.png" alt=""><figcaption></figcaption></figure>

<br>

Click continue and then click away from the next popup and you should see this screen.

<br>

<figure><img src="https://static.wixstatic.com/media/294bf7_3bc601d69c714e208596606fb1f90d74~mv2.png/v1/fill/w_740,h_580,al_c,q_90,usm_0.66_1.00_0.01,enc_avif,quality_auto/294bf7_3bc601d69c714e208596606fb1f90d74~mv2.png" alt=""><figcaption></figcaption></figure>

<br>

Step 9: Click Action and search for your email platform in the app list.

\
The specific action event to select is dependant on the email platform you are using and their respective integration options available in Zapier. Typically, most email platforms will have something like "Add/Update Subscriber", which will create or update the user details in an audience or list. Your platform should also support a workflow or automation that will send an email when a user is added in this way.

In the action event, you will also need to connect to your email platform account and provide API keys as appropriate.

<br>

Step 10: Map the subscribed user to the right fields

<br>

The example below shows the Add/Update action in Mailchimp. In the appropriate field, click the + icon to reveal the Smorg subscribed user fields that you can map. In the example below, the "Subscriber Email" field in Mailchimp is mapped to "User email" from Smorg. You would then repeat this for the other fields as needed.

<br>

<figure><img src="https://static.wixstatic.com/media/294bf7_0ad193caec314daa91c20abeeabdbf72~mv2.png/v1/fill/w_740,h_564,al_c,q_90,usm_0.66_1.00_0.01,enc_avif,quality_auto/294bf7_0ad193caec314daa91c20abeeabdbf72~mv2.png" alt=""><figcaption></figcaption></figure>

<br>

**Advanced use cases**

In the Smorg Zap trigger, there is also "User created" trigger. Whenever a user signs up, they first create an account and then subscribe. You can set up a separate Zap to catch this trigger and create a user in your email platform, and then if the user then goes on to subscribe the Zap as defined above will then also trigger and the user can then be updated as a Subscribed user.

<br>

This will allow you to identify and target all those customers that created an account but did not subscribe.

\ <br>


# Using Zapier to provision users

If you want to create your own sign up flow outside of Smorg, here's an easy way in which you can use Zapier to collect new user details from an external website platform and provision users within Smorg.

{% embed url="<https://files.gitbook.com/v0/b/gitbook-x-prod.appspot.com/o/spaces%2Fr9bdlQGFzhny8zWPvxIn%2Fuploads%2Ft0NvbxrLwYnmim4RcSwS%2FZapier%20user%20provisioning%20-%20Made%20with%20Clipchamp.mp4?alt=media&token=db1856e1-070c-4e75-b29f-fd55829d82c0>" %}


# Integrating to Shopify

Can my customers pay for the app in my Shopify site? Can I bundle the app into other products I sell using Shopify?

You can use Zapier to integrate directly into your Shopify site, so that you can add it as a Product in your site, and attach recurring subscription payments via plugins like Recharge.

This guide will show you how to set this up, assuming you have a Shopify account and the Recharge Shopify App.

## Provision users when customers buy your customers

First create a new Zap, and in the trigger section find the ReCharge Zapier Integration. From the trigger events, select the New Subscription event and then connect to your account.

<figure><img src="/files/m0yuCabyBL97M84nvyxE" alt=""><figcaption></figcaption></figure>

For the Action, select Smorg and select Provision a new user.

<figure><img src="/files/inoWsWixhsqm5INLh4Xs" alt=""><figcaption></figcaption></figure>

You can then configure this action by filling in the information in the configuration screen:

* You should already have the Space ID from your Studio account
* For the other fields apart from password, use the "/" key to map the appropriate fields from the Recharge trigger.&#x20;
* For the Correlated User ID, map the email address
* For the password field, set a default password that will be used for all your customers, and in the communication to your customer you can advise them to change it once they have logged in.
* IMPORTANT - for the subscription expiry date, pick a date way in future e.g. 1st Jan 2100 so that your customers are always subscribed until they cancel.

<figure><img src="/files/9uMSOpGkFMTcFr5RqZJy" alt=""><figcaption></figcaption></figure>

## Handle subscription cancellations

You'll also need to create a new Zap to handle member cancellations. In this case, choose the Recharge Zapier Trigger and choose New Cancelled Subscription

<figure><img src="/files/Rc2u7Yrqes37XfAVCHki" alt=""><figcaption></figcaption></figure>

The Smorg Zapier action you would the configure would be the "Change user subscription expiration"

<figure><img src="/files/bEAAV7bMZj2ftZTZDqWj" alt=""><figcaption></figcaption></figure>

You can then go ahead and configure this action by mapping (using "/"), the expiration date to the cancellation date as provided by the Recharge Zapier trigger in the previous step.

You can also create a further Zapier action to send an email to your customers relating to the cancellation. FInd out how to do this by following the steps in this guide [Using Zapier to send welcome emails](/integrations/using-zapier-to-send-welcome-emails)and follow from Step 10 onwards.

## Send an email to your new customers

Follow this guide [Using Zapier to send welcome emails](/integrations/using-zapier-to-send-welcome-emails)to automate the sending of emails to your customers.


# Stripe Integration

How does the Stripe integration work?

We integrate with Stripe in a number of different ways.

### Platform integration

Smorg Studio allows you to connect your Stripe account to ours forming what is known as a "connected account". This allows us to collect subscription payments on your behalf in your app, and pass on the funds directly to your Stripe account.&#x20;

#### How do I connect my Stripe account?

Follow the instructions in [Setting up pricing](/managing-your-app/setting-up-pricing#connect-to-stripe)

#### Can I manage Stripe customer subscriptions in my own account?

Yes! All your customers that pay via Stripe will appear in your Stripe account.You can then manage them directly, e.g. cancelling a subscription.

#### Can I apply Stripe coupons?

Yes! You can create coupons in the Stripe dashboard and then distribute them to your customers. In the end user payment page, there is a input field to enter the coupon code to avail the offer.

#### Can I sell other products through my Stripe account without conflict?

Yes! Any webhooks are generated by Stripe are filtered such pnly subscriptions that are related to Smorg platform are processed. This means that if you have other subscriptions available for non Smorg products, they will not be affected.


# Setting up pricing

How do I set up subscription pricing?

This page shows you how to set up pricing for your app so you can take payments for members.&#x20;

### Connect to Stripe

Before you can set up pricing, we need to connect to your Stripe account. This creates what is called a "connected account" which is then used to allow us to take payments from your members, and pass directly into your own Stripe account (and into your bank account!).&#x20;

So please make sure you have a Stripe account, and have your Stripe account details handy

In Smorg Studio. go to Your App section and click the link in the Stripe configuration section to being the integration.

<figure><img src="/files/Ljp3r8tqY77EZBLajQrz" alt=""><figcaption></figcaption></figure>

Go through the steps that follow to connect your account. Once completed successfully, you'll see a message like the one below.

<figure><img src="/files/CyCwy317u2R3ytqhwkVa" alt=""><figcaption></figcaption></figure>

### Set up your membership tier

A membership tier defines the subscription pricing that your app can offer. We currently only support one active membership tier. You can find membership tiers in the Memberships section in Smorg Studio.

<figure><img src="/files/3jsTa1wq6farozt2aBBm" alt=""><figcaption></figcaption></figure>

When you create a new membership tier, there are several options that you can define:

#### Short description

This is a short paragraph of text that is displayed with the pricing options.

#### Periodical pricing

You'll need to define at least one of the options: monthly, quarterly or annual. If any are left blank, they will not appear as options to the end user in the payment screen.

#### Free trial

Check the 7 day free trial option if you want to offer a free trial to your customers.

#### Preview your subscription page

You can preview the subscription page as it appear to end users by going to Your App and clicking "Set up your subscription page". You can further edit this page to add in videos. images and text, and change the colours too.

<figure><img src="/files/YczBWcvutbUx2JDfmRxs" alt=""><figcaption></figcaption></figure>

#### Activate your tier

When you are ready to publish your pricing, click Activate

### How do I change pricing in the future?

To do this, you would create a new membership tier with associated pricing. You'd then deactivate your previously active tier, and activate the new tier. New members would then see the new pricing, whereas existing members would continue with the older pricing.&#x20;

Please note that we don't currently automatically update the new pricing for existing subscribers, although if you need this we can do this for you offline.


# Testing your App

## Testing your App

Once you have designed and created content for your App, then it's a good idea to test it out for yourself, and with your friends and community. Here are some ways you can do it.

### Using your web sign up link <a href="#viewer-orm7d227" id="viewer-orm7d227"></a>

The simplest way is to locate your sign up link and share it. You can find it in Smorg Studio, under the "Your App" section. The same URL can also be accessed via the QR code in this screen.<br>

<figure><img src="https://static.wixstatic.com/media/294bf7_76899401e5424e4cbdff35f3f5688277~mv2.png/v1/fill/w_740,h_569,al_c,q_90,usm_0.66_1.00_0.01,enc_avif,quality_auto/294bf7_76899401e5424e4cbdff35f3f5688277~mv2.png" alt=""><figcaption></figcaption></figure>

**NOTE that to test this (without needing to actually pay), it's important not to set up any membership tiers, or deactivate any that you have set up,**

The link will display your landing page, and clicking the "Join" button will then take you through the sign up journey, and then onboarding and then into your App.

**NOTE: Please do not use your existing Smorg Studio login to sign up to your App. Instead use a different email address, e.g. your personal email.**

This will give you a "web view" of your App (i.e. in a browser), and will work on mobile or desktop browsers

### In Apple App store, using TestFlight <a href="#viewer-m6whg2768" id="viewer-m6whg2768"></a>

Once we have added your App bundle to your App Store Connect developer account, you will have the ability to test the App using something called TestFlight, You can find out more about TestFlight here (<https://developer.apple.com/testflight/>)

TestFlight is an App that can be downloaded from the App store. Normally, you would do the following:

1. Invite users to test via email
2. They would then download and install the Testflight App on their Apple device.
3. In the TestFlight App, they will be able to see your App listed with instructions to Install and then Open.
4. Your App will be installed on your tester's phone, and they can then use it.
5. If you have set up In App Purchase subscriptions, they will be able to "pay" using their normal Apple ID but they will not be charged.

\
You can use TestFlight to test "internally" with your team, and also "externally" with the public, typically as part of a beta test.

To access this, go to your App in your App store connect account and go the Testflight section.<br>

<figure><img src="https://static.wixstatic.com/media/294bf7_d60b7f9e6ffc41f49e46678fc800851e~mv2.png/v1/fill/w_740,h_530,al_c,q_90,usm_0.66_1.00_0.01,enc_avif,quality_auto/294bf7_d60b7f9e6ffc41f49e46678fc800851e~mv2.png" alt=""><figcaption></figcaption></figure>

\
For internal testing, create a new group in the Internal Testing section and add your team members. If you need to create new users, you will go the Users and Access menu and add them there, for each of them giving them a role, choose one of Account Holder, Admin, App Manager, Developer, or Marketing role (as appropriate).

For external testing, you can simply go to the external testing section, create a new group and then add testers. There are quite a few options available to you, e.g. you can create a public link for users to access, or upload a CSV file of names and email addresses, or add them one by one.

NOTE: for external testing, we need to submit your App to Apple for approval (for testing). This is not the full approval process, just a way to check for illegal content.

### Testing In App Purchases

For normal testing, you will be able to user your normal Apple ID to simulate the In App subscription payment for your App. However this will only work once, and if you need retest the payment, we will need to set up an sandbox for you to use. Once we've done, the process to test is as follows:

1/ Delete your existing Testflight App

2/ Go to TestFlight and install your Testflight App

3/ Go to App Store and log out of your account

4/ Open the Testflight App and go through the account sign up and click Subscribe

5/ When prompted, sign in with the sandbox Apple ID that we provide.

6/ You should then see the success message and entry into the App.

### In Google Play: closed user testing <a href="#viewer-d5y3c3834" id="viewer-d5y3c3834"></a>

<br>


# Smorg image size reference

Imagine sizing reference

For reference, here is list of image sizes used within the Smorg Studio for image content in the App.

| Name                 | Description                                                                                  | Size (W x H) |
| -------------------- | -------------------------------------------------------------------------------------------- | ------------ |
| Program Thumbnail    | The program thumbnail image that is displayed in the Programs screen                         | 400 x 345    |
| Splash Page          | The page that is displayed whilst the app is loading                                         | 428 x 926    |
| Background image     | In your App theme, the background image that is displayed in the My Day screen               | 1280 x 768   |
| Desktop banner image | This is the image displayed as a banner in the My Day screen for desktop/tablet devices      | 1280 x 260   |
| Recipe cover images  | Images for recipes that are shown in the Recipe detail page, and recipe cards around the app | 1024 x 1024  |
| Lesson cover images  | The cover image shown in lesson cards throughout the app.                                    | 1024 x 600   |
| Content cover images | The cover image that is shown in content cards throughout the app                            | 1024 x 600   |

\ <br>


# Manage Members

How do I manage my members?

#### The manage members screen <a href="#foo" id="foo"></a>

The "Manage Members" screen allows you different options to help manage your members.

<figure><img src="/files/nvXjDynuSbYffYKoCOG0" alt=""><figcaption></figcaption></figure>

#### Manually subscribing users <a href="#foo" id="foo"></a>

You can manually subscribe customers if they are "Not subscribed", or the subscription is "Expired".

<figure><img src="/files/1s6iU2NTCxQZmYiLeKOT" alt=""><figcaption></figcaption></figure>

#### Changing a user password <a href="#zf7kb5160" id="zf7kb5160"></a>

For all users, you are able to manually change their password for them by just selecting the Change password option.

<figure><img src="/files/xstROG5rEOQ7DZPwSuzL" alt=""><figcaption></figcaption></figure>

#### Change an expiry date on a subscription <a href="#k7hgs301" id="k7hgs301"></a>

If a customer is subscribed, AND you have acquired user via our API (either our REST API or Zapier), or if the user is a "test user" with an expiry set to the date 01/01/2100, you will be given the option to "Change expiration".

<figure><img src="/files/D1Tv9l4hVMIDKwYItBTv" alt=""><figcaption></figcaption></figure>

#### Deleting users <a href="#id-540nf238" id="id-540nf238"></a>

If a user subscription is "Expired", or "Not subscribed", or the user is "test user" with an expiry set to the date 01/01/2100, then you will be given an option to delete a user. Remember - deleting a user will delete this user from our system permanently with no way of recovering that user. PLEASE USE CAUTION.

<figure><img src="/files/4Mfj9foBT6sSEzMOhiYp" alt=""><figcaption></figcaption></figure>

It's also possible to delete users that have been subscribed via API, first by expiring the user and then deleting. See the video below:


# Frequently Asked Questions

Got a question? Some of our most frequently asked questions answered.

{% content-ref url="/pages/0zPZnx12MtSZzd5uumtH" %}
[Can I add my own recipes?](/frequently-asked-questions/can-i-add-my-own-recipes)
{% endcontent-ref %}

{% content-ref url="/pages/VGdumrwDneLsytfbq6fv" %}
[Can I brand the app?](/frequently-asked-questions/can-i-brand-the-app)
{% endcontent-ref %}

{% content-ref url="/pages/QTnrQIXuKiGJmq1PsJuX" %}
[Can I create my own meal plans?](/frequently-asked-questions/can-i-create-my-own-meal-plans)
{% endcontent-ref %}

{% content-ref url="/pages/RxNbJxcRp6G8xlYinOkw" %}
[Do you support payments?](/frequently-asked-questions/do-you-support-payments)
{% endcontent-ref %}

{% content-ref url="/pages/lYlPFT7kNbqVCjhrzYQP" %}
[Can I create exercise programs?](/frequently-asked-questions/can-i-create-exercise-programs)
{% endcontent-ref %}

{% content-ref url="/pages/GASct88E0TJNIw6vVC68" %}
[Do you support personalised nutrition?](/frequently-asked-questions/do-you-support-personalised-nutrition)
{% endcontent-ref %}

{% content-ref url="/pages/hip6VEp9ANxzL77ZTmnZ" %}
[Is there support for shopping lists?](/frequently-asked-questions/is-there-support-for-shopping-lists)
{% endcontent-ref %}

{% content-ref url="/pages/vvUHLuzM2kRd8puxDXJQ" %}
[Is there a calendar planner in the app?](/frequently-asked-questions/is-there-a-calendar-planner-in-the-app)
{% endcontent-ref %}

<details>

<summary>What types of meals can I include in my meal plan?</summary>

You can include breakfasts, lunches, dinners and snacks. You can order it so that you can have as many of these meal types as you like in a day. See [What's in a recipe?](/recipes/whats-in-a-recipe)

</details>


# Can I add my own recipes?

How can I upload my own recipes?

Using Smorg Studio, there are many different ways you can add your own recipes - including:

* Importing recipes directly from an internet recipe sites
* Importing from spreadsheets/documents
* Creating recipes using AI
* Manually adding your own

<figure><img src="/files/AKwHnecPPJhAZsRMaGNb" alt=""><figcaption></figcaption></figure>

FInd out more about adding your own recipes here: [Adding recipes](/recipes/adding-recipes)

#### What else can I add to a recipe?

You can edit and configure everything in your recipe including meal types, images, ingredients, descriptions (which support video), category tags, notes. Furthermore, the **nutrition information** including macros and allergens are calculated automatically using AI. Find out more about what's in a recipe here: [What's in a recipe?](/recipes/whats-in-a-recipe)

#### Can I add my own ingredients?

Yes, you can add your own specific ingredients. This is done as part of an offline service we can provide for you, contact us to find out more about this.

#### Do you have your own database of recipes?

Yes we have our own database of over 2000 recipes that you can also access and use.

#### How do I organise recipes?

Smorg Studio has a very intuitive drag and drop "Kanban board" interface allowing you to organise recipes really easily in category lanes and boards. It's a bit like Trello! Find out more about how to organise your recipes here: [Organising Recipes](/recipes/organising-recipes)

<figure><img src="/files/wOMEFSXmxn4DhGPca8TI" alt=""><figcaption></figcaption></figure>


# Can I brand the app?

Can I add my own brand, logo, theme and palette?

Yes you certainly can! Here are some examples of client apps below. As you can see, the platform allows a lot of customisation to allow you achieve the look and feel you want that matches your existing brand assets.

<figure><img src="/files/QQKN9ReUCMofisiP7hL8" alt=""><figcaption></figcaption></figure>

Customisations include adding your own logos, brand colours (palette), splash page, landing page, and menu bar navigation.


# Can I create my own meal plans?

Can I create my self guided meal plans for my members to follow?

Yes you can create your own structured meal plans, including meals, and optionally courses too that can be dripped to your members over time. Find out more about how you can create these here: [Find out about Programs](/programs/find-out-about-programs)

<figure><img src="/files/GegftYhDt8qwnM0dY0Ke" alt=""><figcaption></figcaption></figure>

<details>

<summary></summary>

</details>


# Do you support payments?

Do you support end user payments? Monthly subscriptions?

Our platform is fully integrated into Stripe and offers full support for monthly memberships, allowing you  to define monthly, quarterly and annual pricing for your members.

Find out more here: [Setting up pricing](/managing-your-app/setting-up-pricing)


# Can I create exercise programs?

Can I upload exercise videos and incorporate them into programs? Can I create separate exercise courses? Can I create drip courses?

Using the programs feature, you can create structured programs of exercises (and optionally meals too) that can be drip fed to your customers on a daily basis. Find out more about this feature here: [Programs](/programs/find-out-about-programs)

You can also create courses that are independent of programs and can be consumed concurrently by your members. You can find more about courses here: [Courses](/courses/find-out-about-courses)  &#x20;


# Do you support personalised nutrition?

The platform supports personalised nutrition and personalised meal scaling. You can choose to use this in your programs to personalise the nutrition targets for your members.

When set up, your members will go through an onboarding journey in the app that calculates their personalised BMR based on the Mifflin-St Jeor equation. This means that every member will have their own personalised daily calorie target. You can also choose to have meals scaled to fit these personalised calorie target, a feature known as personalised meal scaling.&#x20;

You can find out more about setting up personalised nutrition in this section [Personalised nutrition](/programs/personalised-nutrition)


# Is there support for shopping lists?

Does the app generate a shopping list?

In the end user app that you create, your members can dynamically create shopping lists based on the meals that they choose.

<figure><img src="/files/JztEbYwGbtPELNZPcVnb" alt=""><figcaption></figcaption></figure>


# Is there a calendar planner in the app?

Can customers plan their programs on a calendar planner?

The end user app has a calendar planner that allows them to plan their meals and courses on a calendar planner. An example is shown below, which includes an optional nutrition header that shows personalised nutrition targets.

<figure><img src="/files/zwxBrN1wdgmTiR5WTpJH" alt=""><figcaption></figcaption></figure>